The self installing router is simple to set-up. You do not need to use the CD supplied and if your PC/Laptop has a working (switched on) wireless network card, it will pick up the wireless (WiFi) connection once the router has been installed correctly.
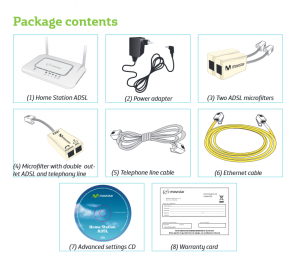
Before beginning the installation, check that your ADSL broadband connection is active (if unsure, please check with Customer Service 1004). Make sure that you have everything you need: Ethernet phone line cable and the power supply (see picture). You may also need thebroadband user name and password that are supplied in a confirmation letter after your ADSL was activated:
NOTE: The password (clave) to access the WiFi service can be found on the label on your router.

Installing Microfilters:
Microfilters separate the broadband signal and telephone calls from each other. If you do not install microfilters, your internet connection will experience problems with connections and speed. Your telephone will also have a high pitched squeal, if microfilters are not used on every phone socket where a phone is connected.
To attach your filter, please carryout the following 3-steps:
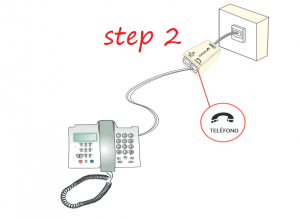
- Remove your telephone from the master socket
- Plug the phone line into the filter, the telephone should be placed in the socket marked ‘TEL‘ or with an symbol depicting a telephone (see image):
- Plug the filter into the master socket, where the phone was removed from.
Voila! A successfully installed a microfilter. If you pick up your phone you should be able to hear a dial tone.
If you do not hear a dial tone, you have connected the filter incorrectly.
Installing your router:
There are 2 ways to install you router, with an Ethernet cable (normally yellow) or via WiFi (wireless) network.
First, however, it is important to connect the supplied cables to the correct ports of the router.
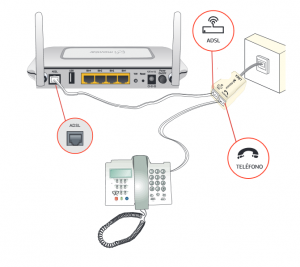
- Connect your thin grey/white cable to the filter, that you have already installed. The lead should connect to the port marked ‘ADSL‘ or with a computer symbol.
- Connect the other end of the thin grey/white cable to the grey port on the back of the router.
To switch on the router.
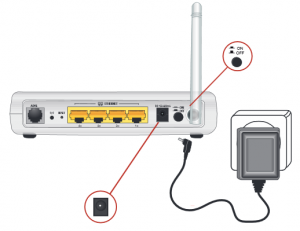
Connect the power lead into the back of the router and the plug in a socket (Do not connect anything to your computer yet!). Push the button at back of the router to the ON position. Wait a few minutes (up to five) for flashing green LED lights to turn constant.

Warning: Do not turn off your Home Station ADSL while it is upgrading because it could damage your equipment.
Installing ADSL with Ethernet cable.
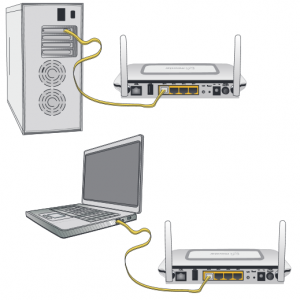
- Make sure your computer is switched off. Repeat: Turn off your computer now!
- Plug the supplied Ethernet cable (normally yellow) into the router port marked ‘Lan 1’ or ‘1’
- Plug the other end of the Ethernet cable into the Ethernet port on your computer, this is normally marked with the Ethernet symbol (see image next to title).
- Switch your computer on and wait for it to start. Once your computer has fully started, start and open web browser such as ‘Internet Explorer’ or ‘Firefox’ by double clicking on the browser icon.
- In the ‘Address Bar’ at the top of the screen, enter ‘www.fever-pitch.com’, for example.
If the website opens…WELL DONE! you have successfully installed your broadband connection.
To connect via WiFi (wireless).
You can use the wireless network as long as your computer is equipped with a wireless adapter or this is integrated into your equipment (external WiFi adapter).

The first step is to enable the wireless network for your router. This is done by pressing the button Wifi located at the back for five seconds. The Wifi indicator on the front will light up in green and blink while it navigates.

Connection using Windows wireless
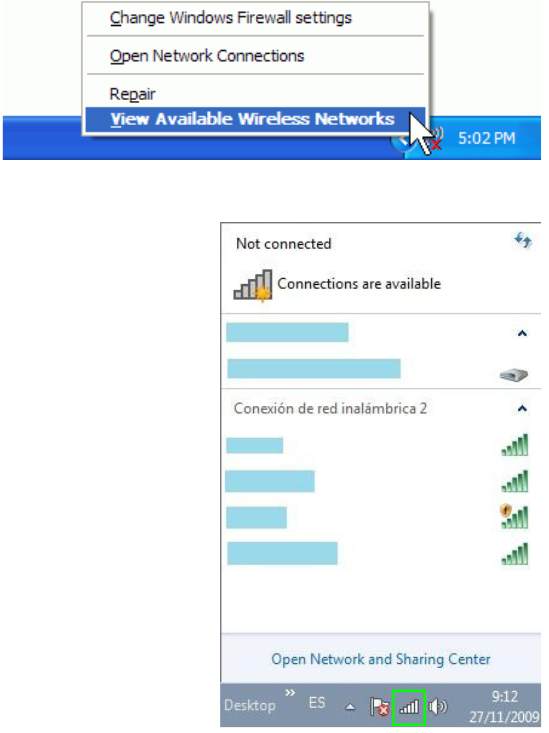
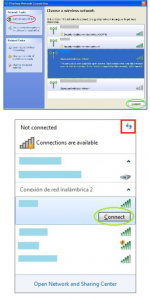
- For Windows XP SP2 or Vista, right click with the mouse on the wireless network connection icon on the system tray (next to the clock) and select “View available wireless networks”.
- For Windows 7 and up, left click with the mouse on the same icon and and select “View available wireless networks”.
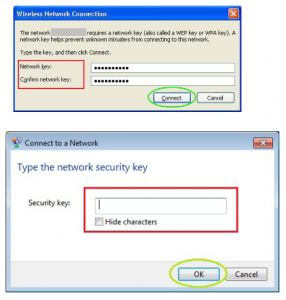
You will then be asked to enter the security key that appears on the router label.
IMPORTANT. The wireless security key for the router is of the WPA/PSK type and its format is alphanumerical. Make sure that you enter that security key exactly as it appears on the label.
Finally, check to make sure that the wireless network connection icon for the system tray indicates that the connection has been correctly established.
*For wireless connection for non Windows operating system, please check the installation manual on the CD rom.